
Aaah, eyeshadow. A key part of any makeup look, bringing colour to the face and highlighting the eyes. Any tutorial you’ll watch on YouTube will feature eyeshadow, whether it be a base colour for your eyeliner or the main feature of the look. And I understand that sometimes watching these videos can be very daunting. How the heck did she make it look like that?? There are four different colours there! How did she blend them like that?? So I thought, for my first ‘Beauty Guide’ post of my ‘Beauty Blog’, I would do a beginners guide on how to apply eyeshadow. Because everyone’s got to start somewhere right?
I remember the first eyeshadow palette I ever bought (which now I think about it, was probably the beginning of a rather expensive habit). If you, like myself, live in the wonderful country that is England, then there is a very good chance you are familiar with the brand Makeup Revolution. A great brand in relation to their prices, I would definitely recommend their products, especially to beginners. It was a Revolution eyeshadow palette which I bought that day, and it’s a Revolution Palette which will be used in this guide. (Just a little side note that the Palette is only £4. £4!!!!!! That’s a bargain any way you look at it, can you really afford NOT to buy one?!)
So we’ll start with brushes. Now honestly, you’re not really going to get anywhere if the only applicator you use is the stupid little sponge one that comes with most eyeshadow palettes. Those things are useeeleeesssssss. (If you’re reading this and have found a way to use those stupid little sponge applicators to make your eyeshadow look fabulous, then I applaud you. I bow down to you for your skill and talent, and beg that you contact me immediately and tell me HOW) And I’m not saying that you have to go drop £50 on 5 Sigma brushes either. When you’re starting out you just need a few brushes of different shapes and sizes so you can learn what’s best for the job you’re trying to do.
The brushes I have below are the Real Techniques ‘Eye Makeup Brush Starter Set’.  These are reasonably priced – you can buy them from Superdrug for £20.99 – but if that’s still too much for you, you can buy some pretty good Dupes from eBay for about £15 (You can also go look in places such as Boots and Superdrug for brushes in similar shapes and styles – Superdrug have own brand brushes which are not as great a quality, but will help you learn how to get the job done.) The Real Techniques brushes are great for beginners, as they have the different shapes required for applying your shadows in different ways. I’m now gonna talk you through each brush and a way to use them. I’d like you to bear in mind that I’m not saying this is the only way to use the brushes, just a guideline on how to get effective results. I’m no expert myself! But I know how it feels to hold a brush and not have the foggiest idea what to do with it, and I’d like to alleviate some of that stress. (Images of brushes are numbered according to each name, hover over to know which is which)
- Base Shadow Brush – Can be used to apply base colours and colours that cover a large area of your lid. Can also be used to apply looser glitter shadows, but ONLY BY PATTING THE COLOUR ON. Sweeping a glitter over your lid won’t get you anywhere, as there will be so. much. fallout.
- Deluxe Crease Brush – Can be used to apply darker colours around the edge of the lid, as well as patting glitters to the same area. If clean, can also be used to blend colours around areas where there’s too much going on.
- Accent Brush – This one’s a bit of a multitask-er. Can be used for applying shadow to smaller places, such as your tear duct or under your lash line. Can also be used to apply cream eyeshadows (we’ll cover those another time), and applying glitters.
- Fine Liner Brush – It’s in the name, this one’s for applying eyeliner. However, can also be used as another detail brush if you’re getting desperate/artistic.
- Brow Brush – Unrelated to this post but still included in the set, this brush is for filling in your eyebrows. On a side note, this brush is perfect for it’s job, and I don’t think I’ll ever use a different one.


So now I’m gonna show you how to create a simple yet effective look that should only take about ten minutes once perfected. Now honestly, the only way you’ll ever improve at stuff like this is experimentation and practise, so it might take a few attempts. But that’s cool! My eyeshadow game was weak as hell when I started, and I’m still learning now. I just have fun with it, and so long as you don’t expect perfect results with your first attempt, you can have fun with it too.
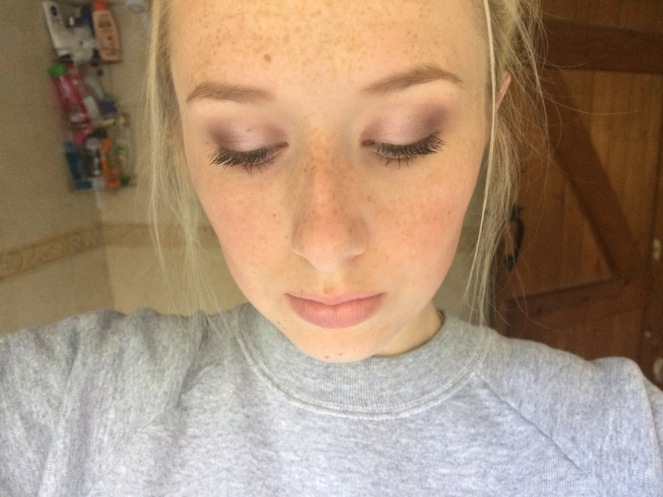
This is the look we’re going for today. I’m using a pink shadow palette, and as you can see this creates a bright look on my eyes. However, this can be recreated with any colours you fancy! Once you’ve got the idea on how to apply the shadows, the world is your oyster!


So this is the palette! The Revolution Iconic 3. I love this palette, because the range of colours means you can create daytime and evening looks. And as I mentioned before, only £4! If there’s anything I love just as much as my dog and liquid lipsticks, it’s a bargain.
To start, I pri med my eyes with Revolution’s Focus and Fix Eye Primer (I’m not sponsored by Revolution I promise. Just a poor person who definitely is not against taking advantage of their super affordable prices) This step isn’t entirely necessary, but using any primer on the lids WILL help make the colours more pigmented, as well as making them last all day. I wear this look to work quite a lot, and using primer means I can come home from a muggy cafe with my eyeshadow looking just as fabulous as when I left my house.(Beware for many awkward close ups of my eyelids to demonstrate each step. I spent more time trying to get presentable pictures than I did doing my eyeshadow. Visuals help right?…)
- So after my eyelids are primed and ready, I sta
 rt by using the base shadow brush to sweep the palest colour of the palette all over my eyelid. This helps to create a nice base, and means that all the colours will blend together easier when they’re applied.

- Next, I use the deluxe crease brush to apply one of the matte brown colours to the outer corner of my eyelid. I take this colour to almost halfway across my eyelid, using a combination of patting and circular motions to build the colour up to my desired look. You can take this colour us far up and around your eyelid as you like, as it’s your
own style! Just remember, don’t worry if you don’t like how it looks! Colours can be blended out using round fluffy eye brushes, and if worst comes to worst a bit of tissue will help you remove any unwanted shadow. We all make mistakes eh? - Next I apply a glitter of a similar shade on top of this colour, just to give my eyes an
extra bit or sparkle.
- I’m now going to go back to the base shadow brush (I know, shocker! I’m using the same brush twice! I cleaned it though, so it’s all cool) and apply the same brown matte colour to the inner corner of my eye. I only put the shadow on one side of the brush, and use this side facing downwards, towards the tear duct. This gets the colour in the desired area without getting too much build up, as you want this area to stay slightly subtle. Don’t worry if this looks messy, as we’re going to blend glitter over the top next!

- For the final step, I take the glittery pink colour
 (eeeeee glitter it’s my favourite I love it) and apply it to my eyelid with the accent brush. This eyeshadow is a lot looser than the others in the palette, so I apply this shadow in a patting motion, until all of the desired area is covered with pink glitter. A little bit of blending with my base shadow brush and I’m done! Throw on some mascara (cause you’re probably going to look really silly without it) and you are good to go!
Now obviously after reading this, you’re going to need to play around a bit, finding the way that works best for you. While guides are always going to help, at the end of the day it’s you applying the eyeshadow, not me. However, I do hope that this little guide (Little?! Who am I kidding, while it may have taken you five minutes to read, it’s taken about 6 hours to plan, prepare and write) has helped you decide how (or how not) to apply your eyeshadow. This can be recreated in so many different ways; lighter colours for every day wear, darker shades at the edges to create a smokey evening look, and rainbow colours for those of you who just loveeeee mixing it up.
Thank you so much for reading! Please feel free to comment below if this helped you in any way, or even if you just liked the presentation, as any feedback helps me! If you read this and thought ‘damnnnnn that actually helped me, I wonder what she has to say about this…’ pleaseeeeee feel free to email me, as I’d love to know what people want to read about and will happily take any requests. Also, if you have twitter, please feel free to follow my account (The link is on this page somewhere, just scroll around a bit)
I think from now on I’m going to try post once a week, as that gives me plenty of time to plan and write each post, as well as the boring task of proofreading after. So my friends, I will see you in a week!
Thanks for reading, much love,

P.S. Now if you follow any beauty accounts on twitter, you will probably know that there are a number of amazing giveaway accounts out there, that choose winners of amazing beauty products for no reason except the kindness of their heart! (I follow loads of these, cause dayumm who’s gonna say no to free makeup) Now the other day I was talking to a giveaway account called @MatteLipstix, and they gave me their Mercari code to use (If you don’t know what Mercari is, it’s another selling platform, like Shpock or eBay). Now I’m gonna share the code to you, as it gives you credits to spend on the website! The code is ‘CYJQYT’, so shove that into the section named referral code and BAM! Free money for you my friends. Ciao Amigos.

Such a good post idea, I love it x
I’ve just posted a makeup look on my blog, would you mind having a look and letting me know what you think? X
https://georgicox.wordpress.com/2016/08/03/fresh-springsummer-makeup/
LikeLiked by 1 person
This is an awesome beginners guide. You did an awesome job! And I LOVE Real Techniques!
-Sierra
http://www.theglamgala.com
LikeLiked by 1 person
Thank you! Real Techniques products are just so nice to use, love them 🙂 x
LikeLiked by 1 person
Love your eyelook, it is beautiful! ❤
LikeLiked by 1 person
Thank you so much 🙂
LikeLike
This was lovely great for beginners or just for a brush up really enjoyed reading this
LikeLiked by 1 person
Appreciate it 🙂
LikeLiked by 1 person